HALL - CARPENTER, CO.
By Edwin T. Scallon, Copyright © 1990, 1995, 2008 All Rights Reserved
ACCIDENT RECONSTRUCTION AND BAC CALCULATION PROGRAMS
LAMP EXAMINATION FOR BEING ILLUMINATED DURING COLLISION
As part of an accident investigation, the question of whether the vehicle’s lights were on or not can be an important issue. Did the car have its headlights on at night? Did the driver use the turn signal before making his turn? Did your client see the brakes lights of the car stopping for traffic? Many times, the proper examination of the vehicle’s lights can answer these questions and be a deciding factor in determining fault.
Vehicle lamp examination as part of a traffic crash investigation can be accomplished if the examination is conducted properly and the lamp is collected in a manner that will cause no damage. Vehicle lamp examinations are commonly completed where there are discrepancies regarding the status of the vehicle’s lights.
Vehicle Lamp Design
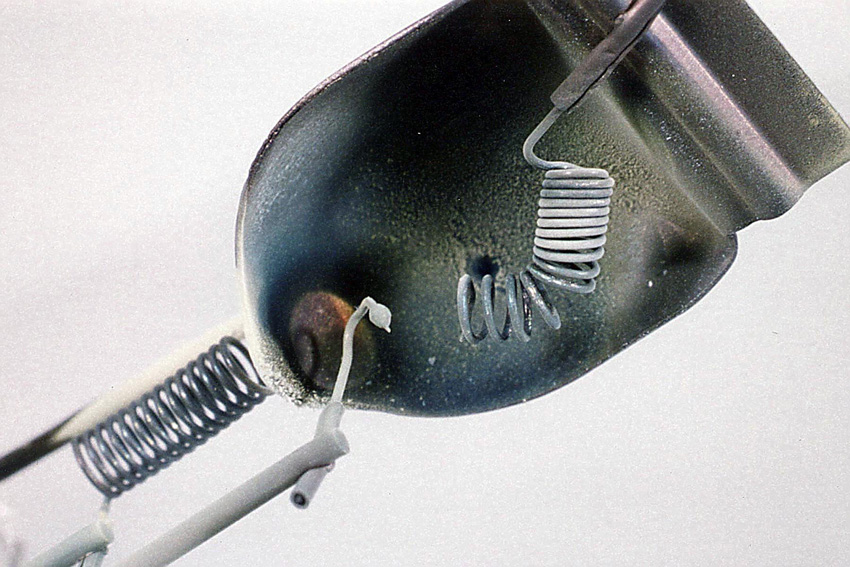
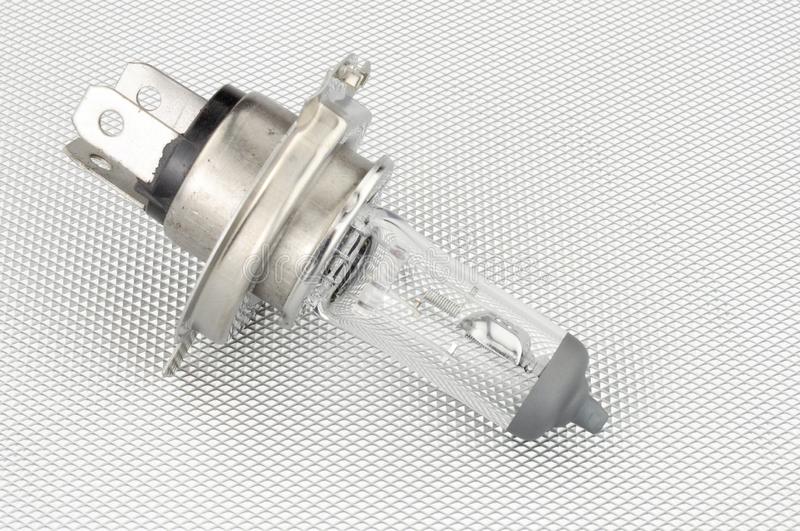
Vehicle lamps are all designed in the same basic manner. A sealed beam lamp will consist of a glass envelope containing an inert gas. An inert gas is chemically inactive and will not react with anything.
The glass bulb is attached and sealed to a base. On the base, an investigator will typically find the trade number and manufacturer of the lamp as well as the contact lug pin. These items should be noted by the investigator examining the bulb.
Inside the glass bulbs are filament terminal supports, usually made of steel, and encased in an insulator. The filament is crimped or clamped to the ends of the support. The filament is usually made of tungsten and is coiled into a series of loops, evenly spaced throughout the length of the filament.
When the lamp is in a stage of incandescence, an electrical current is passed through the filament which raises the temperature to the point it glows. This can produce a temperature up to 4,000°F. The filament becomes soft and susceptible to deformation.
Vehicle Lamp Examination
The first step an investigator must complete in a vehicle lamp examination is to ensure the lamp is not inadvertently damaged or destroyed before it can be examined. If the lamp is still attached to the vehicle, it should be carefully removed and packaged as evidence using standard evidence collection procedures and in a manner that loose parts, such as the filament, cannot be lost.
The examination should start with recording the identifying information of the bulb. The best method is using a form specifically designed for this purpose. These forms can be either be produced by the investigator or there are several forms that can be copied or downloaded.
The examination of the lamp should be completed under a microscope or other magnifying object and, as in all evidence examination, the lamp should be photographed, from various angles and perspectives, and detailed notes of the examination procedure should be completed.
When the filament is hot, the temperature can be in excess of several thousand degrees Fahrenheit. With the filament at these temperatures, it becomes soft. If the glass bulb stays intact during an impact, a filament that was incandescent will stretch and coil indicating it was on during the impact. This distortion of the filament is called “hot shock” and can be classified as major distortion. Minor distortion, slightly bowed or curved filament, is caused by the age of the lamp (called “age-sag”) or during the manufacture of the lamp. Minor distortion will still display uniform spacing of the filament coils.
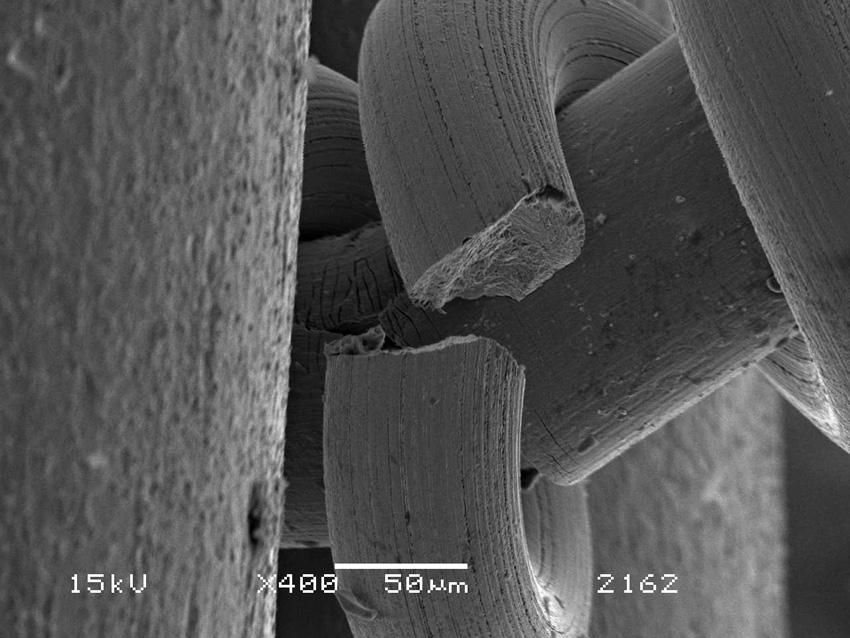
If the glass bulb is broken and air is allowed to contact the incandescent filament, then the glass can melt and fuse to the filament. On occasion, this fused glass will form small beads of melted glass on the filament that sometimes will require a magnifying device to see. When air contacts the stem and support posts, the oxygen will react with the hot post and stem and “oxidation” will occur. This is evidenced by a while or yellowish power that will form on the filament or the stem/posts.
If the filament is cold or is not incandescent, then there will be no stretching of the filament. If the filament breaks, it will fracture, not stretch. At times, pieces of the filament can be found inside the glass bulb. If the glass bulb breaks and oxygen enters the space, making contact with the filament and stem/posts, there will be no oxidation as the components are not hot and will not oxidize with the air entering the space. During “cold shock””, the filament will display damage in the form of clean, sharp breaks.
If there are reports of the vehicle lamps being on, but dim, then the investigator must consider the possibility of a mechanical issue. Lamps need electrical current to illuminate. A low illumination of a lamp will most likely be caused by a fault in the electrical system. The most common issue involved is the alternator of the vehicle which converts mechanical energy to electrical energy. If a faulty alternator is suspected, then the investigator must have it inspected and tested by a qualified mechanic.
STRETCHED FILAMENTS SHOWING THEY WERE ILLUMINATED


An incandescent light bulb emits visible light when an electric current is passed through the finely coiled wire filament suspended inside its glass bulb. The dense tungsten-based filament softens at hot incandescent temperatures and can be stretched by the filament’s own inertia when the bulb is abruptly accelerated during a crash. This stretching phenomenon is called “hot shock” and its presence indicates that a bulb was on at the time of impact. If instead, the bulb were off at impact, the filament would be cold (less soft and deformable), which can lead to a broken filament rather than a stretched filament, or no damage at all to the filament.
The figure below shows digital microscope images of a bulb with hot shock compared to an undamaged exemplar bulb. This examination was done non-destructively by carefully looking at the filament through the glass envelope of the bulb. The stretching of the filament and uneven coil spacing show that this filament was energized at the time of impact. In contrast, the undamaged bulb has uniform coil spacing and no evidence of stretching.
Observe the difference between inserts A and B. 'A' shows what is meant by deformation or stretching of an illuminated lamp. 'B' on the other hand shows no such stretching or deformation of the filament. Conclusion, bulbs in inserts 'A' were receiving electrical current at the time of impact, whereas inserts 'B' demonstrate no such stretching or deformation of the filaments indicating that the bulbs were not receiving any electrical energy - in other words they were not on, they were turned off.
There is only one way to open as sealed beam headlight for examination of the filaments. You will need the floowing tools:
1. Propane Torch
2. Wet Towel
3. A surface that will not burn
4. Small hammer and Disposal material
The following is the procedure to opening a sealed beam headlight:
1. Place the sealed beam face down on a surface that will not ignite, with the three connecting prongs pointing upward (you will be looking at the outside of the reflector portion of the headlamp)
2. Light the propane torch and begin heating the rear reflector surface of the Sealed Beam, (the glass portion that contains the three prongs)
3. Keep torching the reflector in a circular motion circumscribing the reflector as close to the seal as possible
4. Keep the propane torch flame circulating on the rear surface of the headlamp for about 1 minute
4. Immediately turn off the torch and place the wet towel over the headlamp (you should hear cracking of the glass at this point)
5. Remove the towel and let the headlamp cool
6. Once cool (about 30 minutes) remove the broken glass from the headlamp being careful not to disturb the filament by lifting the rear of the lamp housing from the face by pulling on the three prong electrodes
7. Turn it over and lay the three prongs and the remaining glass on a surface with the filaments pointed sideways or upwards
8. Photograph the filament(s) to preserve the evidence and then carefully, examine the filament for stretch or breaks
9. Carefully preserve the opened headlamp in a box so as not to disturb the filament(s)
If the filament is stretched or broken that is an indication that the lamp was illuminated at time of impact. Be careful at this point in jumping to a conclusion that the lamp was not illuminated, since the impact might not have caused a dramatic deformation of the filament as shown above. Stretched filaments will show that power was being applied to the lamp at time of impact. A filament that is not discolored, stretched or broken is a good indicator that the lamp was not illuminated at time of impact.
If the collision was at night, and the the collision was a head on type collision, the filament of the lamps will demonstrate at a bare minimum stretching and more likely a broken filament as shown below:
The following are photos of filaments that show no energy being applied upon impact.
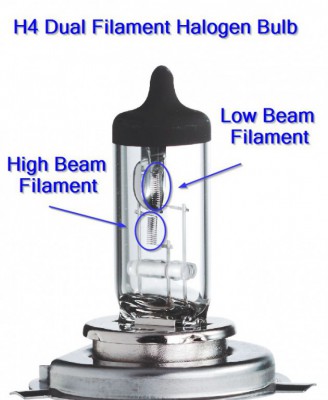
You do not have to open the newer halogen or like bulbs since you can observe the filaments through the glass. Remember also, at the scene if the filaments are located from the bulb or the bulb is broken, the filaments can still be analyzed in the same manner as those filaments still within the globe of the bulb.